Lets talk about resolution. No, not your new years resolutions you’ve given up on, image resolution. We touched on this briefly during our scanning article, but resolution can be quite a confusing subject for any printing newbie, so we thought it best to go into more detail about resolution and how it can impact your prints.
What is resolution?
The resolution is effectively the quality of the image. The higher the resolution, the better the image quality, the crisper the final print.
Resolution is measured in PPI, which stands for pixels per inch. Pixels are the tiny little squares that make up the images on your screen. Prints however, don’t use pixels to create an image, but rather dots of ink. This is why we sometimes refer to resolution as DPI, or dots per inch. Either way, the thing to remember is the higher the number, the better.

Why is this important?
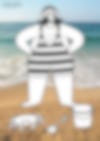
The above image has been split into three segments. The first section is this image at 300DPI, the second at 150DPI, and the third at 72DPI. See how the detail and the quality of the image decreases?
If the resolution of an image is below 300PPI (or DPI), then the printer does not have enough information to produce a high quality print, resulting in a pixelated or blurry image. Imagine trying to produce a design using only dots. the less dots you use, the less detailed the image. The more dots you use, the more detailed. This is why we (and most other printers) require files to have a resolution of at least 300DPI.
Resolution is also linked to size. For example, if you have an image at A5 size with a resolution at 300PPI, but you’d like to print it at A4 (twice the size), in order to size this up, the pixels have to cover a larger area, meaning that the PPI will go down.
The same concept can be applied to the reverse. If you have an A3 file at 72PPI, but would like it printed at A6, when shrinking it down, more pixels will be packed into a smaller area, thus increasing PPI and the quality of the image.
Still confused? Think of the pixels as the last dollop of jam when preparing your morning toast. Spread that jam over half a slice of toast, and you get a nice rich covering of jam. Delicious. Spread the same amount of jam over a full slice of toast, and it’s spread much too thin, giving you that nasty taste of burnt bread. Nobody wants that.
This is why it’s important to make sure that your images are at a high resolution, and at your desired printing size. The pixels in relation to the size of the file is known as effective PPI.


How do I change the resolution of my image?
PPI can be set manually. The more pixels it takes to make up one inch of artwork, the higher the PPI, and the better the resolution. Way back in the early days of computers, the standard screen resolution was 72DPI. Although screens nowadays display at a higher quality, many softwares still save images at this resolution, so look out for this when setting and exporting your artwork!
Once you’ve set the PPI of a document, it is very difficult to increase it. Most software will increase the PPI by shrinking the size of the document, cramming all that jam- sorry, pixels, onto a much smaller canvas. When we enlarge the image back to correct size for printing, the resolution goes back down again, and we’re back at square one.
If your image is a photograph or scan, the best option is to recapture the artwork at a higher resolution. Either rescan, or if you’re using a DSLR or other high quality camera, try shooting in RAW format as opposed to JPEG for more control over the quality.
If your image is digital, check your PPI and make sure you’re exporting it at the highest resolution possible.
If you’re using vector (non-pixel based) software such as Adobe Illustrator, it’s better to export your files in PDF format for a higher resolution. For raster (pixel-based) software, it’s best to export as a high quality JPEG.
Frequently Asked Questions
I already produced my artwork at a low resolution – what can I do?
Sadly, once an artwork has been produced at a low-resolution, it can be difficult to improve its resolution. There have been recent developments in upscaling technologies which can help with this, most notably the superzoom tool in Photoshop, or other online AI alternatives which may be worth exploring.
We could also print your artwork at a smaller size, which could alleviate things slightly.
My artwork’s DPI is higher than 300 – is that okay?
It’s quite common for scanners to reproduce artwork at 1200 dpi – this is not a problem at all – so no need to reduce this when preparing your artwork.
We hope that clarifies some things for you! What’s important to note here, is that if you would like a small file printed at a larger scale, keep effective PPI in mind and try capture it at the highest resolution possible. Overall, we much prefer images at a higher resolution. If you’re not sure how to reach that magic number of 300, aim for as high as possible. It’s better to go over then under.
If you have any further questions about resolution, don’t hesitate to ask! You can always drop us a message at artwork@print.work


