The essential step to make your wild and wonderful shapes come to life is: cut lines. But what are cut lines? Why must you have them? Don’t worry, we’ve created a quick guide to help answer these very questions. Follow to these tips, and you’ll be an expert in no time.
What are cut lines?
Cut lines are essentially lines which indicate the shape of your design. They can be any size, but are always singular, solid, and are not visible on the final print. Crucially, they are lines, not filled shapes. We need cut lines to know what shape you would like. Without them, we’re a little bit lost.
We need cut lines providing for your custom cut stickers, sticker sheets and any bespoke die cut shapes!
How do they work?
We use a super smart digital die-cutting machine to create our custom shapes, custom stickers and sticker sheets. Think of it as a friendly, scalpel-wielding robot, who loves nothing more than making funky shapes. We call it Velma. To produce your shape, Velma uses a blade that follows cut lines to a tee, slicing through the paper just as you want.
How to create them?
Creating cut lines is relatively easy. All you need to do is create a new layer in your artwork file and draw a singular line around your image in the shape you want. We ask that this line be kept on a separate layer to the artwork, so that we can ensure it does not appear in the final print.
Textured brushes may look good in your artwork, but aesthetic doesn’t matter with cut lines. In fact, textured cut lines can confuse Velma, so it’s best to use hard, standard brushes— or preferably the pen tool.
Tight angles on the cut line can cause the paper to fray at the edge, resulting in a scruffy finish. Try to avoid sharp edges for a clean-cut, smart looking edge.
If the cut lines are not obvious, they can easily be mistaken for part of the artwork. Velma prefers pure magenta, which is quite uncommon, making it the ideal colour for cut lines as it is easy to distinguish from most artwork.
Make sure to save or export your artwork as either a PDF, PSD, or AI file to ensure that the layers remain intact. Oh, and don’t forget to embed any linked files.
Spacing and bleed
Avid followers of our tech guide series will be pleased to hear that bleed also applies to stickers & custom cut shapes. If you’re not familiar with bleed, you can check out our article on the subject here! It’s a firm fan favourite.
Without bleed, any minor inaccuracies will appear in the final print. This means parts of your artwork may be cropped, whilst areas of unwanted colour could accidentally be included.
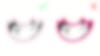
Rather than having bleed at the edge of the page, stickers require a 1.5mm bleed outside the cut line, and a 1.5mm safe area within it. In practice this means that the cut line will be at least 1.5mm away from your image, and sit within a 3mm area of colour. Check out the example below:

A few lines on the lines
When it comes to cut lines the most important thing is to keep it simple. Remember these tips, and before you know it, you’ll be a cut line pro – there will be no holding you back.
- Use a singular, solid line around your image(s) (not a shape).
- Keep the line(s) on a separate layer to the artwork.
- Use the colour magenta.
- No textured brushes.
- Keep the line 1.5mm away from your image, with a further 1.5mm bleed beyond the line.
- Avoid any tight angles or sharp edges.
- Save or export your file as a PDF, PSD or AI file to keep the layers intact.
- Embed any linked files.
If you’re struggling, a handy template can be downloaded from the sticker product pages, or we’ve added some helpful examples you can download below.
We can’t wait to see your custom shapes!